
Introduction
Education is changing fast. Teachers are moving away from traditional lectures and trying new approaches that put students at the center of learning. One method gaining serious attention is the flipped classroom, and at its heart are voice-based explanation videos that make this teaching style possible.
If you’re wondering “what is flipped classroom teaching” or “how these videos actually work in practice“, you’re in the right place. This guide breaks down everything you need to know about using voice-based explanation videos to implement this model, without the confusing educational jargon.
What Is the Flipped Classroom Model?
The flipped classroom model is a teaching approach where students learn new material at home, usually through videos or digital lessons, and use class time for practice, discussion, and guided problem solving with teacher support.
Think of it this way: the “lecture” part happens at home through videos, and the “homework” part happens in class with teacher support nearby. This blended teaching and learning approach combines the best of both worlds, giving students flexibility while ensuring expert guidance when they need it most.
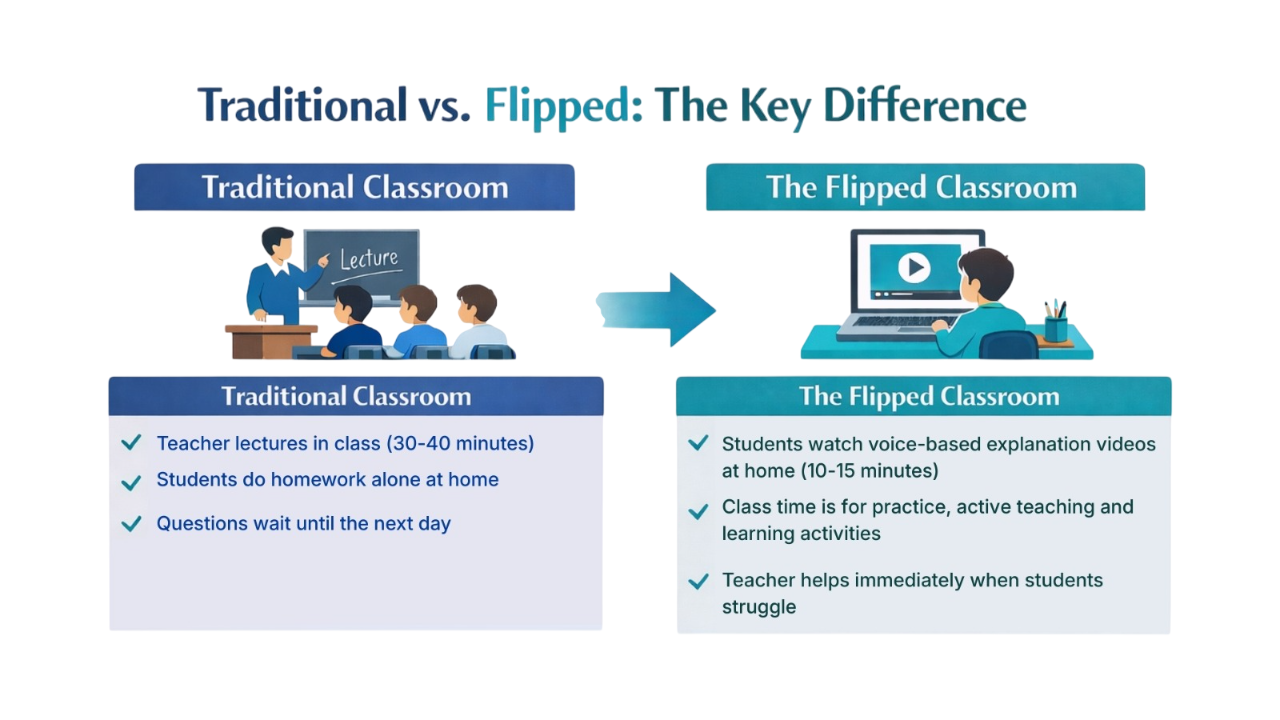
Traditional vs. Flipped Classroom: The Key Difference
Traditional Classroom
- Teacher lectures in class (30-40 minutes)
- Students do homework alone at home
- Questions wait until the next day
The Flipped Classroom
- Students watch voice-based explanation videos at home (10-15 minutes)
- Class time is for practice and active teaching and learning activities
- Teacher helps immediately when students struggle
The flipped classroom approach gives students more control over their learning pace while ensuring they have expert help when tackling difficult problems. It moves passive lecture time outside the classroom, freeing up class for interactive work.
Did You Know?
A 2024 three-level meta-analysis reviewing 129 studies and 12,727 K–12 students found that flipped classrooms significantly outperform traditional teaching methods. The overall effect size was g = 0.53, representing a meaningful academic improvement, with gains seen in both test performance and student motivation.
The research also showed that results depend on how the model is implemented, reinforcing one key takeaway: Flipped classrooms work when they are done well.
Understanding Voice-Based Explanation Videos
So what exactly are voice-based explanation videos? They’re short instructional videos where you hear a teacher’s voice explaining a concept while visuals appear on screen. They’re simple, focused teaching tools that power the flipped classroom experience.
What are the Three Types of Voice-Based Explanation Videos?
- Explainer Videos: Break down new concepts step by step, like introducing photosynthesis or explaining fractions. These videos work perfectly for this model.
- Demonstration Videos: Show how to solve problems, conduct experiments, or complete processes with clear narration.
- Walkthrough Videos: Guide students through complex tasks, such as writing an essay or solving multi-step math problems with detailed voice explanations.
What Makes a Good Voice-Based Explanation Video?
The best instructional videos share these qualities:
- Short and Focused: Research shows 6-12 minutes is the sweet spot. Students stay engaged and retain information better with shorter videos that fit the flipped classroom structure.
- Clear Audio: Your voice should be easy to understand. A decent microphone (even a $30 one) makes a huge difference compared to laptop speakers.
- Simple Visuals: Clean slides, helpful diagrams, and on-screen text that highlights key points. Nothing fancy needed.
- Personal Touch: Your voice creates connection. Students feel like their teacher is talking directly to them, even through a screen.
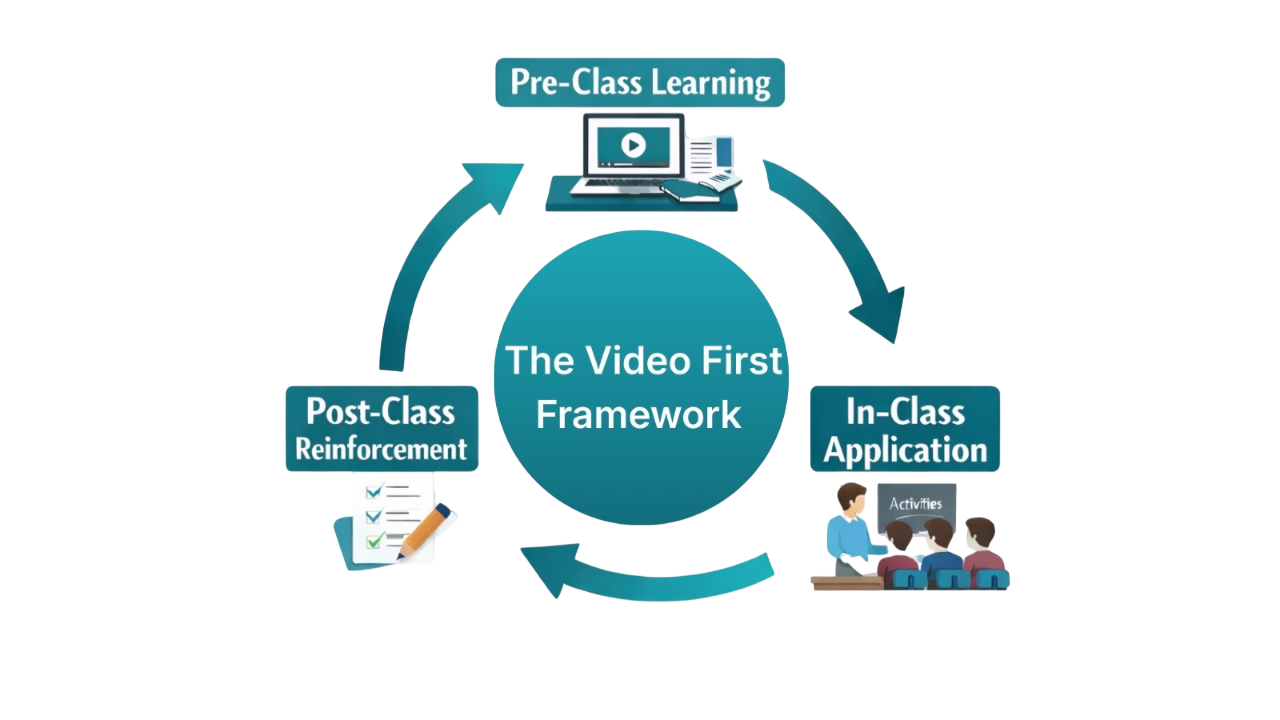
How the Flipped Classroom Works: The Complete Cycle
The flipped classroom has three connected phases that build on each other to create active, engaging learning experiences for every student.
Phase 1: Before Class (Video Learning at Home)
Students watch your instructional video before coming to class. Here’s why this works:
- Independent Learning: Students can pause when confused, rewind to hear something again, or speed up sections they understand quickly. Every student learns at their ideal pace.
- Low-Pressure Environment: Struggling with a concept? No problem. At home, students can rewatch videos three times without feeling embarrassed in front of classmates.
- Preparation for Participation: Students arrive to class already familiar with basic concepts through the videos, ready for hand-on-practice.
Most teachers assign videos the night before or a few days ahead, giving students flexibility to fit viewing into their schedules. This blended teaching and learning cycle ensures students get instruction at home and practice at school.
Phase 2: During Class (Active Application)
This is where the flipped classroom model truly shines. Since students already learned the basics through videos, class time transforms into a workshop.
- Hands-On Practice: Students work on problems, conduct experiments, write essays, or complete projects while you’re there to help.
- Collaborative Work: Students discuss ideas, solve problems together, and learn from each other’s perspectives.
- Immediate Support: When someone gets stuck, you’re right there to explain, demonstrate, or guide them through the confusion. No waiting until tomorrow.
- Deeper Discussions: With basics covered in the videos, class conversations can explore complex questions and real-world applications.
Your role shifts from “presenter” to “coach.” You circulate, answer questions, spot misconceptions, and provide personalized help exactly when students need it.
Phase 3: After Class (Review and Reinforcement)
The learning doesn’t stop when class ends. Students can return to videos anytime for review.
- Exam Preparation: Videos become study guides. Students re-watch challenging concepts before tests.
- Ongoing Reference: Forgot how to solve a type of problem? The explanation video is always available.
- Assessment Feedback: Quick quizzes or checks help you understand what students learned and where they still struggle.
This complete cycle creates a continuous learning loop that adapts to each student’s needs.
The Real Benefits: Why Teachers and Students Love This Approach
The flipped classroom with voice-based explanation videos delivers concrete advantages that traditional teaching struggles to match.
Benefits for Students
- Learn at Your Own Speed: Fast learners can move ahead. Students who need more time can take it without pressure. This flexibility serves diverse learners.
- More Control: Feeling tired? Watch the video later. Confused about step three? Rewind and watch it again. Students own their learning journey.
- Better Understanding: Combining audio explanations with visuals helps information stick. The replay option deepens comprehension significantly.
- Less Anxiety: Asking questions in class feels safer when everyone already knows the basics. This reduces performance pressure.
Benefits for Teachers
- Quality Time with Students: Instead of repeating the same lecture to multiple classes, you spend time helping individual students overcome specific challenges.
- Spot Problems Early: During practice activities, you quickly identify who understands and who needs extra support.
- Create Once, Use Many Times: Record a video once, use it for years (with occasional updates). This saves time long-term.
- Better Work-Life Balance: Once you build a video library, lesson prep becomes faster and more manageable.
Benefits for Schools
- Consistent Quality: Every student gets the same clear explanation through videos, whether they’re in first period or last period, this year or next.
- Scalable Learning: One great video can reach hundreds of students across multiple classrooms and years, making blended teaching and learning cost-effective and sustainable.
- Improved Results: Schools using this model often report higher test scores, better engagement, and improved student satisfaction.
- Modern Teaching: Schools demonstrate commitment to innovative, student-centered education approaches.
Creating Your Own Voice-Based Explanation Videos: Practical Steps
You don’t need expensive equipment or technical expertise to create effective videos. Here’s how to start.
Planning Your Content
- Focus on One Concept: Each video should teach one clear idea. Teaching quadratic equations? Make one video on factoring, another on the quadratic formula.
- Write a Simple Script: Outline what you’ll say. You don’t need word-for-word scripts, just bullet points to keep you on track when creating videos.
- Keep It Conversational: Write like you talk. If you wouldn’t say “utilize” in class, don’t say it in your video.
Setting Up for Recording
Basic Equipment You Need
- Computer or tablet
- Microphone ($30-100 models work great)
- Screen recording software (free options: OBS Studio, Loom’s free tier)
- Quiet space for recording
Recording Your Video
- Open your presentation or notes on screen
- Start your screen recording software
- Talk through the concept as if teaching one student
- Point to important parts on screen
- Keep your energy up (even though no one’s watching live, enthusiasm shows)
Editing Tips
Don’t obsess over perfection. Students prefer authentic teachers over polished productions. If you make a small mistake, just pause, correct yourself, and keep going. You can cut out long pauses during editing, but don’t worry about minor stumbles.
Making Videos Accessible
- Add Captions: Most platforms (YouTube, Zoom) auto-generate captions. Review and fix errors so students who are deaf, hard of hearing, or learning English can access content in the flipped classroom.
- Provide Transcripts: Upload a text version alongside your video. Some students learn better by reading than by watching videos.
- Use Clear Visuals: High contrast text (dark on light background), readable font sizes, and simple graphics help everyone learn better.
Where to Host Your Videos
- Learning Management Systems (LMS): Upload directly to Canvas, Google Classroom, Blackboard, or your school’s platform. This keeps everything in one place.
- YouTube: Create a private or unlisted channel for your class. Easy to organize voice-based explanation videos in playlists, accessible on any device.
- Specialized Platforms: Tools like Edpuzzle and PlayPosit let you add quiz questions right inside videos, making them interactive.
Making It Work: Implementation and Common Challenges
Starting with the flipped classroom feels overwhelming. Begin small and build your confidence.
Getting Started: Start Small
- Week 1-2: Pick One Lesson: Choose a single lesson or unit to flip first. Learn what works before scaling up.
- Week 3-4: Create Videos: Make your first few explanation videos. They may not be perfect, and that’s okay.
- Week 5: Try It Out: Assign videos and run your first flipped classroom session. Pay attention to what goes well and what doesn’t.
- Week 6+: Adjust and Expand: Based on feedback, improve your approach and flip additional lessons.
Solving Common Problems
Challenge 1: Students Don’t Watch Videos
Solution: Make watching part of the grade or use entrance tickets (quick quiz at the start of class based on the video). Most LMS platforms track who watched and for how long.
Challenge 2: No Internet at Home
Solution: Offer before-school or lunch viewing sessions in the library or computer lab. Some teachers load videos onto USB drives.
Challenge 3: Creating Videos Takes Too Much Time
Solution: Start with just one or two videos weekly. Reuse good videos from year to year. Collaborate with other teachers to share the workload. Remember: time invested now saves hours in future years.
Challenge 4: Technical Problems
Solution: Always have a backup plan. Keep videos downloadable in case streaming fails. Have a traditional lesson ready if technology completely crashes.
Challenge 5: Students Struggle Learning Alone
Solution: Create viewing guides with questions to answer while watching. Encourage students to watch together in study groups. Remind them to take notes and write down questions for class time.
Frequently Asked Questions
Keep videos between 6-12 minutes. Research shows students disengage after 12 minutes. If your topic needs more time, break it into two or three shorter videos. Think “one concept per video” rather than “one lesson per video” when building your content library.
Start simple: your computer and a decent USB microphone ($30-80). Free screen recording software like OBS Studio, Loom’s basic plan, or even Zoom works fine for creating instructional videos. As you get comfortable with the flipped classroom, you might upgrade your microphone or try video editing software, but these basics are enough to create quality content.
Use your LMS analytics to track views. Add a simple quiz at the start of class asking 2-3 questions from the video. Tools like Edpuzzle embed questions inside videos that students must answer to continue watching. Make viewing part of participation grades if needed.
Absolutely! Khan Academy, YouTube educators, and other teachers create excellent content. However, many teachers find that students engage more with their own teacher’s voice and examples in the flipped classroom. A good compromise: use existing videos for some topics while creating your own videos for the most important or challenging concepts.
The flipped classroom works best for subjects with clear skills to practice: math, science, languages, coding, and similar courses where blended enhances skill development. It can work for humanities too, though you might need to adapt. For example, in English class, students could watch videos at home, then use class time for discussions and writing workshops.
This requires creative solutions. Provide viewing time during school (before class, during lunch, study hall). Download videos to school devices students can check out. Some teachers use a hybrid approach: flipped classroom for students with access, traditional for those without.
Bring Active Learning to Your Classroom
The flipped classroom model gives students the space to learn at their own pace while allowing teachers to focus on deeper instruction and meaningful support. With Think10x.ai, you can turn question images into clear, step-by-step video explanations that make blended learning simple and practical.
Start small. Upload one question. Record your own voice. Create one video. Try it with one class and build from there.
Join our free beta program today
Get Started Here -> Think10x.ai